Go to: Previous Page or Next Page
Guide to transcribing
In this guide, we will describe how we would like you to transcribe for the purposes of this project. We have tried to keep it as simple as possible but please do get in touch if you are unsure about anything or have any questions.
Don't worry if you come across anything your not sure of, simply carry on around it and ask us about it later.
We will also describe a basic form of “mark-up” that uses square brackets around certain indicators. These will allow us to identify specific elements in the document later on.
A quick guide to our simple transcription mark-up
This is a quick guide to the basic “mark-up” indicators we would like you to use in your transcriptions. Detailed instructions on using this mark-up follow below.
You might want to copy and paste these into a simple text file on your computer and keep them close at hand to copy and paste directly into your transcriptions to save you repeatedly typing them out.
- [????] = Illegible or unclear text
- [!!!!] = Deleted or obscured text
- [SYMBOL] = Symbols and non-standard characters
- [DIAG] = Presence and location of any graphical material (sketch, diagrams, photo etc.)
- [TABLE] = Use at beginning and end of any tabulated data
Spelling, grammar & punctuation
This is an opportunity to show your rebellious side and throw out the rule book!
Why? Because we need you to replicate the written text exactly as it is in the original document.
This is harder than you’d think, since our brains normally try to autocorrect things, but you need to preserve all of the original spelling, punctuation and grammar. This also extends to the word order and things like abbreviations – we need you to simply copy what is written, as it is written.
Why is this important? Different people at different times in history have used spelling and punctuation for different reasons. Notebooks for example are often personal documents and therefore contain many quirks. We do not want to put a subjective contemporary slant on the text, but to replicate a computer readable objective copy of it.
NB: Depending on your web browsers settings, they may try to autocorrect as you type, so keep an eye on it! If you encounter this and can’t find how to switch it off, please contact us and we’ll do our best to help.
Line-breaks
Please try and preserve line-breaks as this will make it easier to review your transcription. Since GitHub is geared towards software developement and computer code, its editing interface will display the text per line (rather than wrapping it to fit it all in the window). This means each line of text is automatically numbered. Once you come to the end of transcribing a line in the original document image, simply hit “return” or “enter” and this should begin a new line as you would normally expect in Word for example.
Pages
The text file you will edit will have all of the pages in the notebook laid out in a list in square brackets.
For example:
[5128-5129]
[5130-5131]
[5132-5133]
These page references are the same as those found in the bottom right-hand corner of each image on the Digital Library.
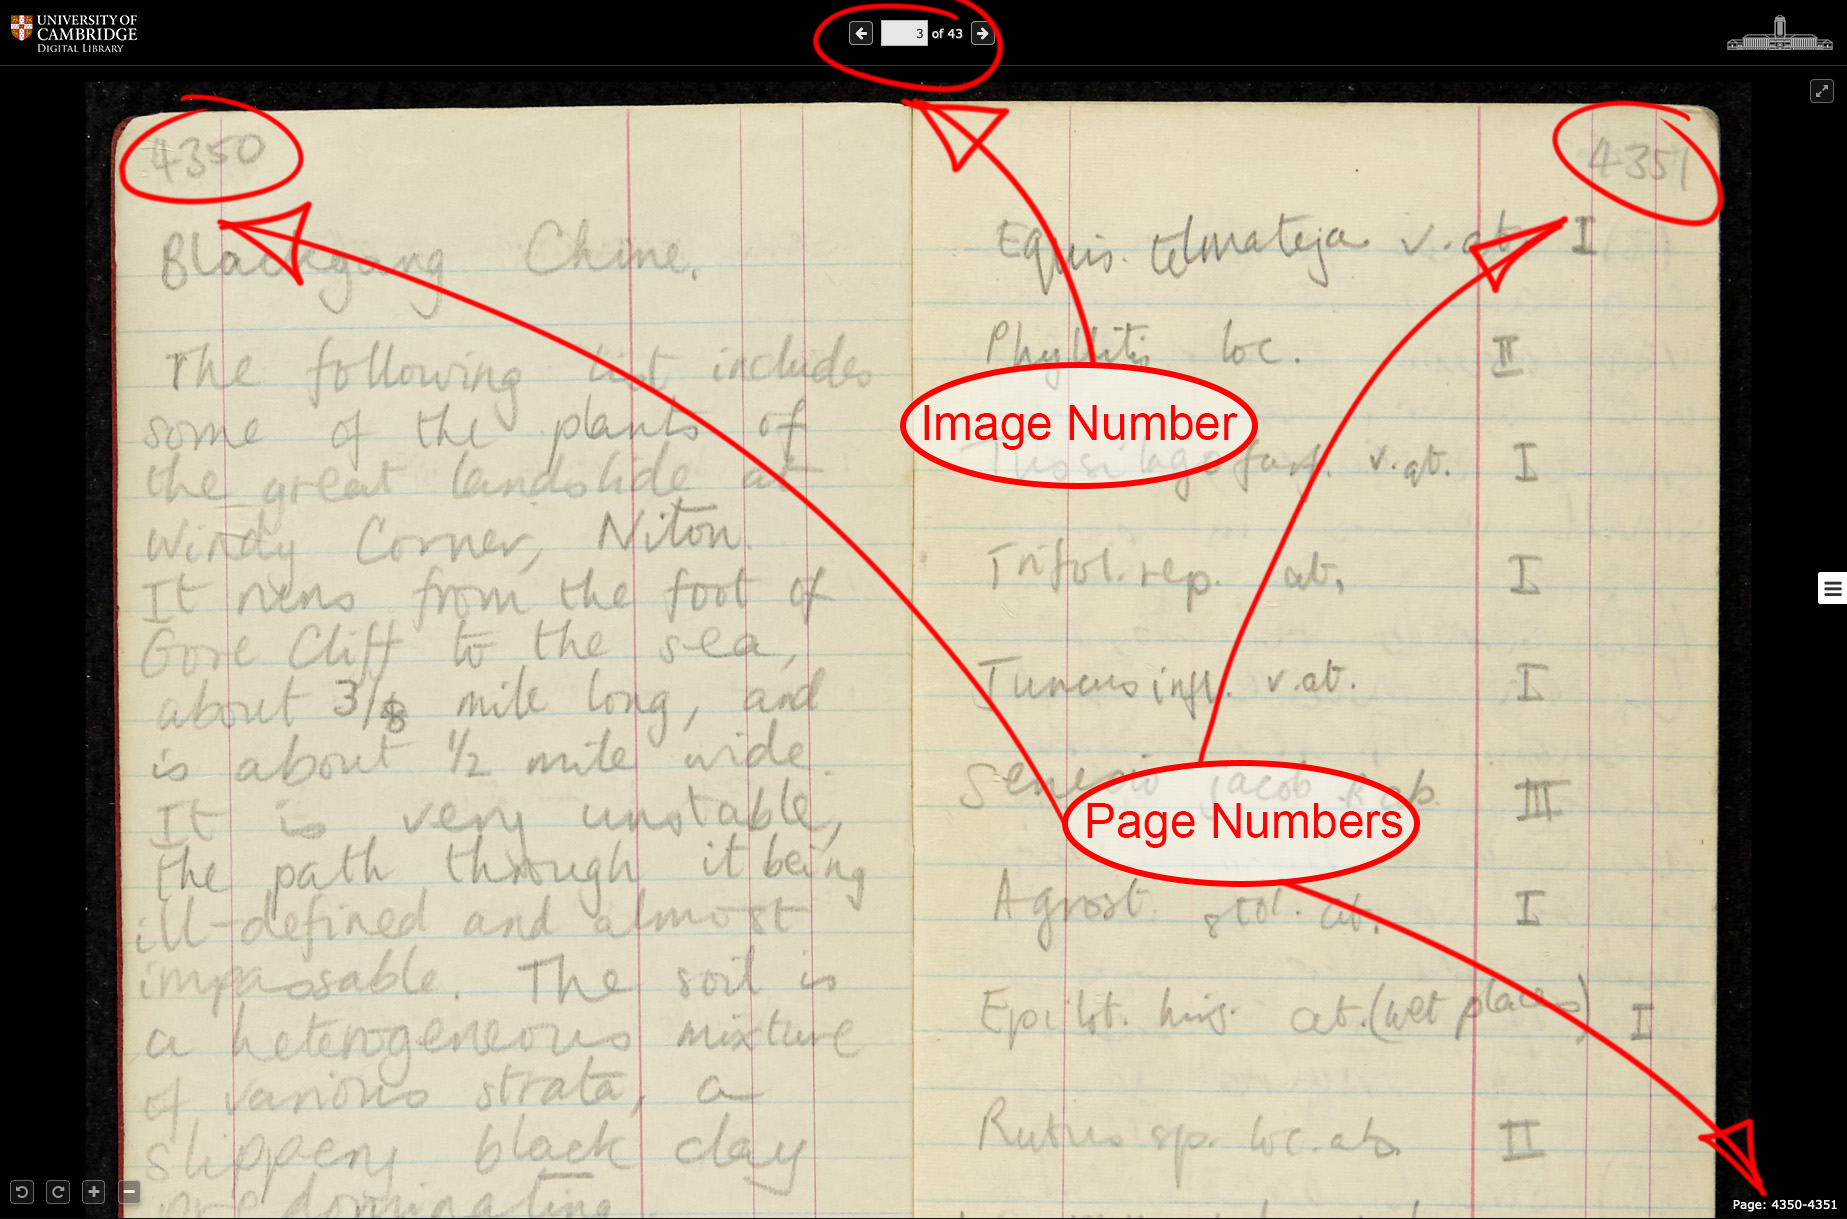
To transcribe text on a page, simply start typing underneath the relevant page reference.
For example:
[5128-5129]
Type what is writen on the page …
[5130-5131]
[5132-5133]
If there is no text on a page, simply leave it blank and move onto the next page.
Font styling (bold, underline, italic, superscript, indentation etc.)
In order to make this process as simple as possible, we do not want you to worry about any font styling such as bold, underline, superscript or indentation etc.
Illegible or unclear text
Some styles of handwriting, or even the author’s own style and haste, mean it is not always easy to read what has been written in the original document. Don’t worry about this at all, simply use a pair of square-brackets around four question marks (“[????]”) to indicate what you can’t make out.
If some of the letters are clear, you can enter what you can make out and use the above to indicate any relevant section of a word that is unclear. For example, using the phrase “Cambridge Digital Library”, if you can only make out some of the letters then your transcription might look a bit like this: “Ca[????]b[????]ge Dig[????] Li[????]y“
Why is this important? As we said above, our aim is to re-create an objective copy of the text in the original document rather than a subjective interpretation of it. Therefore it is safer to be explicitly clear that something isn’t clear rather than introduce any potentially incorrect text. Often it might also be the case that a fresh pair of eyes might see or read something differently to you. This method makes it easy to find any unclear text and perhaps go back to it later on.
Here is a screengrab showing examples of both illegible text and deletions:
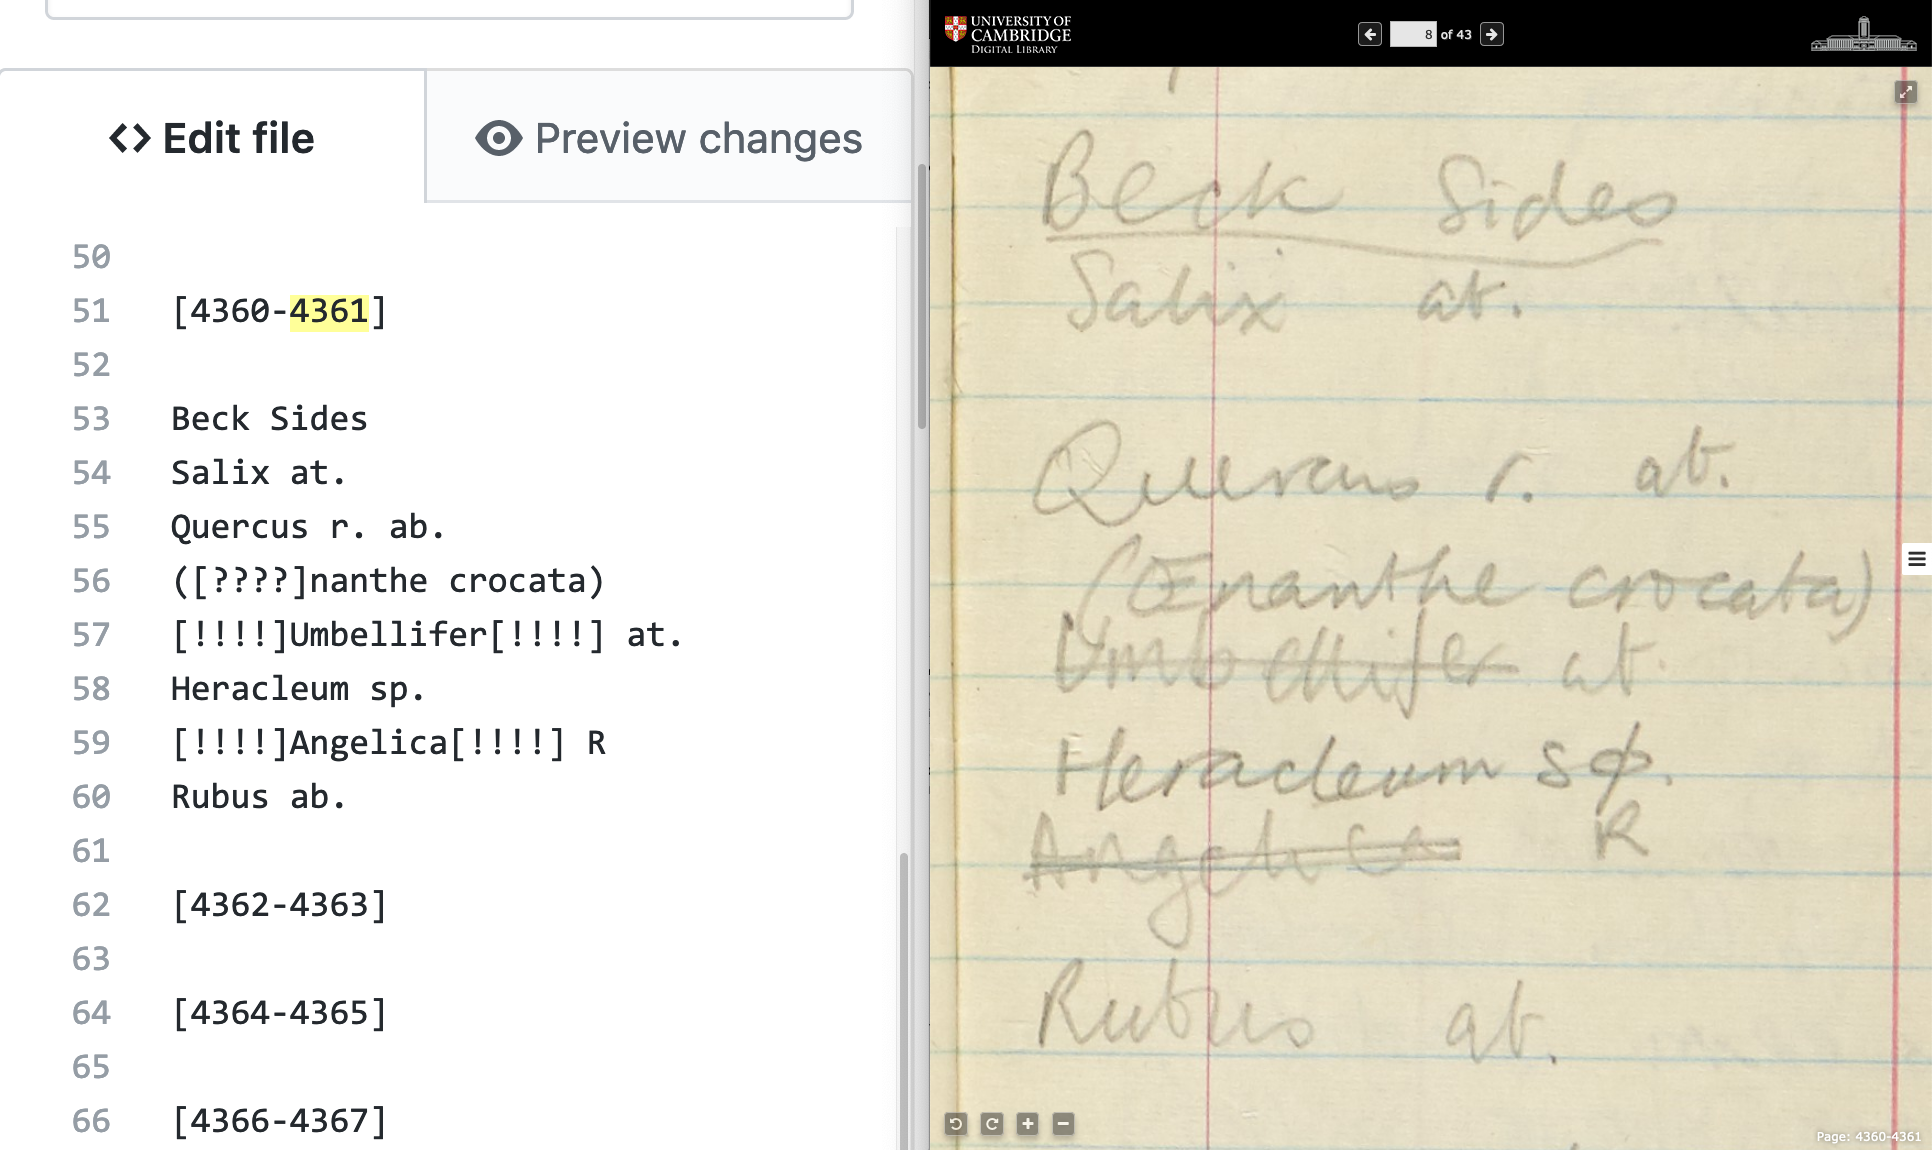
Deletions
If someone has obscured any text in the original document, it would still be useful for us to know that text has been deleted or indeed, if you can make any of it out clearly, what that text was. For example, sometimes an author might put a “cross” over or put a line through a word or chunk of text, or they might have obscured it completely by scribbling/blotting over the top of it for example.
In these situations, please indicate the deleted text by using a similar method as you did for any illegible text but this time use exclamation points (“[!!!!]”) instead of question marks (“[????]”). You can see an example of this in the screengrab image above.
This time though, we would need to know where the deletion begins and ends. Therefore if you can make out some or all of the original text, please insert “[!!!!]” at the beginning and end of the word, or section of words, that has been deleted or obscured.
So if the word “scribble” in the phrase “I don’t like the scribble word” has been completely obscured, your transcription would read: “I don’t like the [!!!!] word”
If it had been crossed out or had a line put through it, your transcription would read: “I don’t like the [!!!!]scribble[!!!!] word”
Symbols and non-standard characters
If you encounter any symbols or non-standard characters, by which we mean anything you can’t enter quickly and easily using a modern computer keyboard, then please indicate these using a pair of square brackets around the capitalised word “symbol” (“[SYMBOL]”). This will mean we can go back over your transcriptions and easily identify and insert any symbols or odd characters at a later date.
Graphical material (Sketches, diagrams, photographs etc)
As with any unusual symbols, it might help us in the future to be able to identify any graphical material that exists in the original text. By this we mean any sketches, diagrams or even if a photo has been inserted. Don’t worry about transcribing any text that is located within any sketches/diagrams etc, simply insert a pair of square brackets around the capitalised abbreviation “diag” (“[DIAG]”) and move on with transcribing the rest of the text. We’ll hopefully be able to go back through your transcription later on and handle these.
Tables and tabulated data
Some documents also contain tables of data and it would be useful for us if you could transcribe these. Formatting tabulated data in plain text can be complex, so we just want you to transcribe these as simply as possible.
Please indicate the beginning and end of tabulated data by inserting a pair of square brackets around the capitalised word “table” (“[TABLE]”) on a new line. Between these two indicators you can use regular spaces and line-breaks to transcribe as normal, but please don’t add any additional characters such as commas, slashes or pipe symbols to divide the data into columns for example. This way it will be easy to review the transcribed words without causing any formatting problems later on or including any characters that the original author didn’t use.
If you are not sure about transcribing tabulated data, you can just insert the “[TABLE]” indicator on a new line and move on to the next piece of regular text. We can then go back over these and review them later.
Next Steps - Get Transcribing!
Now you know how to transcribe, you're ready to start Transcribing!